The Crafty Nomad Has Moved

The Crafty Nomad Has Moved
Click here to go to my Fabulous New Blog!
Showing posts with label Papercrafts. Show all posts

Friday, September 21, 2012

Oh No, It's the Gruffalo!!!

I have a teacher friend who is seriously into The Gruffalo books. It's her 30th next week so I had to make a card along a theme, of course! I also made her a clipboard to use in class.

At the moment there are no scrapbook or stamping Gruffalo products on the market so I was limited to a piece of wrapping paper with which to make my creations!!

The card was made using this week's sketch over at Retro Sketches. I rotated the sketch 180 degrees.  I was inspired by one of the design team cards who used little windows so I thought I would use that idea too.  Inside it reads "...said the Gruffalo!"


I might still add some ribbons to the clipboard at the top. 

Thanks for looking!

Friday, October 29, 2010

Halloween and a birthday card

Hi All

[If you are looking for the Made It Friday Focus post, then just scroll down, it is the next post]
Just a quick post this morning as I should be out the door on the school run!!

I went to a friend's place last night and completed three card projects and prepped two sewing projects which for those of you who know me well will find unbelievable as I am normally REALLY slow!!

The first one is for Unity's Friends with Flair, think I'm too late for that! (I used the layout and turned it upside down! Also putting it in for All sorts (spots and stripes) and Crafty Chicks (punches).


This next card uses my Mystical Meg Digi and one of my sentiments, available here.  I used the sketch from 2 Sketches 4 you and inspiration for colours from Cupcake Inspirations, Also entering it for these challenges asked for Halloween themes: Corrosive Challenge, Crafty Creations.


And last but not least! A sweet treat topper.  Again I used Meg but just her legs!!  And one of my sentiments too.  I had originally planned to  put sweets inside the bag but them changed my mind and put quiz sheets in instead.  Incidentally if you are interested in the quiz sheets they are from the DLTK website which is a fabulous resource for all parents with little kids!

This one is for:

Have a wonderful day, I'll be sewing a Halloween costume for my daughter and working on a Made It Order.

Tuesday, October 5, 2010

Little Owl stack Gift card holder

I made this before I went on holiday but had no time to upload it, which was a shame as I had made it for the Cards Blog Pockets challenge.  My friend Bianca showed me how to put these little cards together.  Thanks Bianca ;-)

It was to go with the Owl on a Unicycle card I made a few weeks ago.


Have a great day.

Saturday, August 28, 2010

Just Us Girls Template Week

So today is my last post as the Featured Designer over at Just Us Girls.  I have had a blast coming up with all the cards and projects using their guidelines!   Thanks for asking me to join in the fun!

Todays challenge is to use a template! The lovely people over at Clear & Simple Stamps  are sponsoring todays challenge.  The winner will recieve a $25 gift certificate to use in their store and there are lots of yummy things over there!  Be sure to check it out!  They graciously provided the DT with a stamp set to use for the challenge and we were asked to use one of the free templates they have on their blog, they are listed in the sidebar. 

I chose the Trick or Treat basket, but instead of making it into a pumpkin I decided to make a cauldron! I switched the cardstock handle for wire, used black cardstock and lined it with some firey fabric!  I put the cardstock through the Big Shot with the swirly Cuttlebug folder.  I made a spider out of two buttons, some wire and a permanent black marker (!) and hung him from the handle with some thin wire.  Added some ribbons and feathers for effect!


I decided to make the little mini pop up card to go along with it.  The cauldron and the sentiment are embossed with black powder.  I used wire to hold the ribbon together at the top.  Here is a picture of just the card.  Included in the stamp set are some cute little stars which I used to make a subtle background using versamark ink.  The little spider is attached to a different sentiment stamp with the same set I just cut him out and popped him on top of a button.


And here is a close up of the groovy little spider!

And just one last picture of the set.

Now it's your turn! Head on over to the JUGS blog and check out all the lovely inspiration form the Design Team and get crafting!  Well have a fabulous day!

Saturday, August 14, 2010

Just Us Girls Technique Challenge

It's techniques week over at Just Us Girls this week.  And this week they have decided to go with a THEME of the 'Wild Wild West'.  Now as I live in WESTERN Australia, Pam said I could do "my" wild west if I wanted!  I had the perfect occasion to make a card for - One of my girlfriends is returning from the UK to live out here again, so I wanted to make her a Welcome Back card.

The area we live in is called The Pilbara and I have chosen typical Pilbara colours for this challenge: Terracotta; Brown; Olive Green; and Sky Blue.  I thought I'd tell you a little about where I live so you see where I'm coming from too.  It's very hot here, with Summers reaching as high as 47 degrees Celcius (117 degrees Fahrenheit) the heat stays with us for about 6 months when it is pretty much always in the 40's.  Winters are beautiful, with lows of 26 degrees Celcius (79 degrees Fahrenheit).  It's very dry here and the earth is red due to the iron ore in the soil.  Skies are pretty much always clear and we rarely see rain so the greens are not vibrant.

I took some pictures when my husband was out mountain biking a few weeks ago.


So now onto the card.  Geckos are something of a symbol here so I went with a gecko on the card.  I stepped outside of my comfort zone and made a free standing pop up card.  I found the tutorial on Splitcoast here.


Here is a close up.  I made the gecko pop up on dimensionals. I typed the sentiment on my PC and just printed it out.  I used the Captain Howdy font for the word 'Outback' that can be downloaded for free here.  The star stamp is Unity, not sure the brand of the Gecko.  Ribbon is Fancy Pants.  To make the tab I used the scallop punch from SU, folded it in half and just used part of a circle punch to snip off the edges.


And here it is when folded flat.


So now you've seen mine, check out the rest of the inspiration and then get busy making a Wild Wild West card for the JUGs challenge.  Can't wait to see them all.

Have a great day.  Remember there is still time to enter my 'Little Lady' challenge and snag yourselves a freebie Digi Image, just scroll back through the entries to find it.

Sunday, August 1, 2010

Rainbow Canvas

Good Morning to you all! Whilst i am away from the little old blog I thought I'd share with you something I made last year.  I was inspired to do an altered canvas.  My daughter's favourite dress at the time was this wonderful tie-dyed rainbow one, that we picked up in a market in Broome whilst on holiday there. Sadly it is now too small for her and is sitting in my sewing box in the hope that I can make it into something else for her!

Anyhow we went out into the garden one sunny day and I took millions of photos of her whilst she goofed around!  And then made this!

Each of those pretty darling ribbons is handsewn onto the canvas frame! [Yes it is true I do have a ribbon addiction!]  The sun was scraps of yellow fabric sewn together.  I handcut the photos and mounted them up on dimensionals.  The sentiment was printed on the computer, the boxes around the words were hand drawn, oh and the rain was hand stitched on to.  Have to say it took forever to make, but I absolutely love it!

Here are some close ups.


Just in case you missed it....I posted a free digi image a couple of days ago and a Challenge to use it and post the resulting card on this blog.  Would love to see some entries when I get back to blogging!

Saturday, July 24, 2010

From Trash to Treasure!

I love the blog: How About Orange! There is always fun stuff on there.  Last week Jessica had a tutorial for making your own gift bags from newspapers.  They looked funky and what a great form of recycling.  As we currently live in a town with no recycling facilities, this appealed to me.  I had been hanging onto a mailorder catalogue from a UK company called Joules because it was no ordinary catalogue!  It had these really funky pages interspersed throughout it, a bit like magazine pages.  And so I decided to make a mini gift bag with one of them.  It measures 3 inches tall by about 2.5 wide and an inch deep.   If you decide to give it a go, I would advise setting your eyelets before you fold it and glue it together!


Thought it was quite apt that on the reverse side of the bag it has the word 'Upcycling'.  My daughter decided it would be good for Easter!

Have a great day today!

Monday, June 28, 2010

Peg Magnets

I love making these little peg magnets! You can put anything on them!  These ones are made with a selection of freebie digital sentiments available over at Create with TLC.  Paulette generously gives away freebies VERY frequently - join up as a follower so you don't miss out.  She also has a whole shop stocked full of goodies!  Normally these sentiment freebies are only for personal use, but if you want to sell things made with them you can now purchase a licence from her to enable you to do just that (like I did!).  Thanks Paulette! :)

I'll be selling these and others made with other stamps at a mini market on Wednesday at the Baptist Church in Karratha (9am - 11am).  I'll also have my t-shirts, baby onesies and other bits and pieces with me too.
Have a wonderful day!

Saturday, May 15, 2010

Just a Quick Post

Hi there

Haven't been very crafty lately.  I'm in the middle of clearing up my craft room!  Stamps are cleaned and put away, next job, try to find the table.  Oh sorry make that try to find the three tables that are apparantly in there somewhere!!

I did make these yesterday though.  I made a stack of them with Mother quotes on for the mother's day market a couple of weeks ago and a friend at work asked me if I could make some with Nana quotes on.  So this was yesterday's creation!  They are peg magnets and Clip photo holders.


Thanks for stopping by - remember to look in on Monday for the big Giveaway! Have a happy day!

Tuesday, April 13, 2010

Sweet Stop Sketch and Cupcake Inspiration Challenges

Made this card for my friend's hubby.  I used the sketch from The Sweet Stop and the images are digital and are by Kelly Medina and are available in a set from My Grafico. Graphics by Mygrafico.


I printed if twice on white card, so that I could raise the side of the boat and the little fish up on dimensionals.  I also printed it twice onto the blue patterned paper for the waves for the same reason.  The little worms are from the same set and I have added dimensional magic to them.  Here is a close up:


I've also made another little milk carton box using Lauren Meader's template.  I used the colours from the Cupcake Inspiration Challenge.  The little Get Well Soon image is a freebie from Meljen's blog.  It's so cute don't you think!


Just got this little butterfly punch from my local craft shop and I just love it!  Think we'll be seeing alot of that soon!  You can see the image better in this picture.

Thanks for looking, have a great day. Hmmm thinking of having a giveaway soon, watch this space......

Monday, March 29, 2010

More boxes...

I made a couple more boxes for the template challenge over at Just Us Girls and made them using the Embellish Magazine challenge criteria too - which was pink, kraft and aqua with stitching.  The milk carton was the same as yesterday's, from Lauren Meader and the little bag template I got from M.McCarthy.  The papers are both Fancy Pants.


And here they are individually.


Close up of the stitching and embossing on the little bucket bag.


Thanks for looking.  Have a great day.

Sunday, March 28, 2010

JUGs and CIC

I couldn't resist using these colours together again from the Cupcake inspiration Challenge for the Just Us Girls Templates Challenge.  I used a Lauren Meader template that I bought ages ago from Papertrey INk I think. The Milk Carton template.  I had to make it bigger to fit the little bottles in.  The birdie stamp is from Unity's February kit.  I think this paperpieced birdie also qualifies for the Moxie Fab World Picking up the Pieces Challenge!


Here is a close up of the birdie.  SHame you can see the dimensional from this angle! ;-)

Thanks for looking and have a great day!

Wednesday, March 3, 2010

Card Set: in progress....

[Edited to add: Just finished the whole set of seven card you can see them here, here and here! or just click on the blog title and scroll through ;-) !]

Hi there! Hope you are having a fab week.  I have had less time for crafting this week, due to several contributing factors all conspiring against me! We had a public holiday on Monday, I've started work again (only two mornings a week!) and I have a house inspection looming!


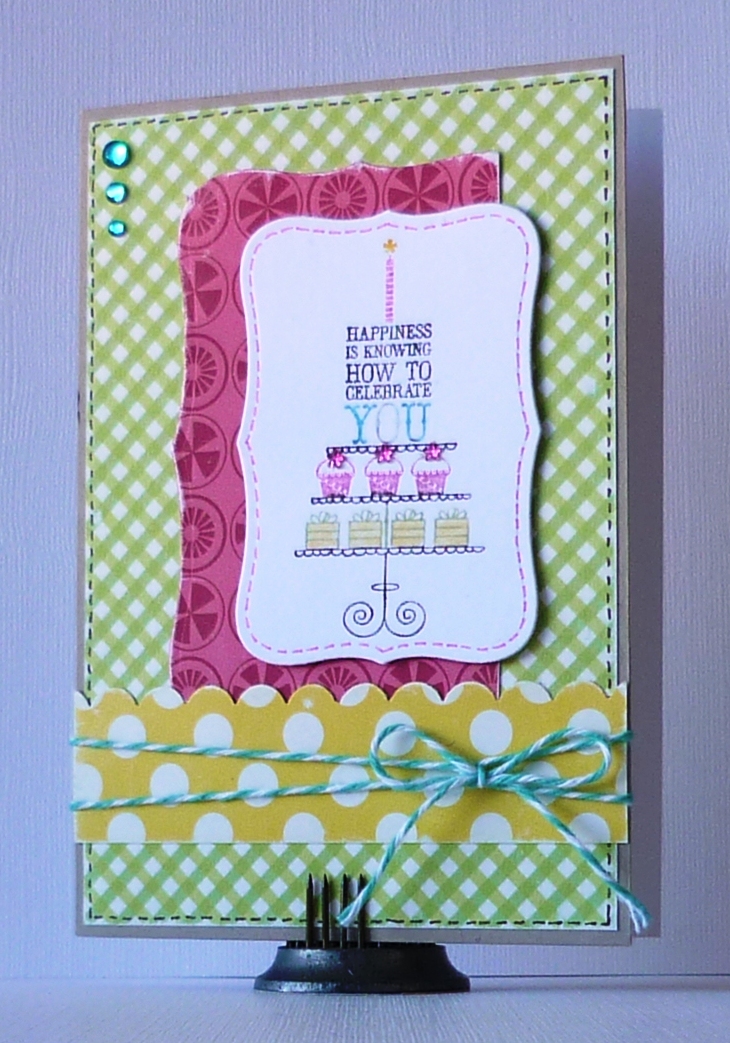
However, I am in the process of making a card set, comprising of six cards each with a different birdie on from my Pink Petticoat set, all made with the same colour combo and will be presented in a matching box!

So today I will share the box and one of the cards.  I just love this colour combination together!  The card I have made using this weeks sketch from Clean & Simple.  I'm loving my new nestabilities!!  The box is made for the challenge at Just Us Girls.  They challenged us to make something using a template.  Their sponsor this week is the very talented Lauren Meader (love her blog!).  She now has an online store: My Time Made Easy, where she sells templates, stamps, digital stamps, cut file accents and digital paper.  For the challenge she offered up a freebie box template.   I downloaded this, but when I came to get started on the challenge I realised I wanted a bigger box for my cards. So I used Lauren's as the guide and based on that, made a template for a bigger one but the same design! Is that allowed?! I don't know, but I figured as I'm not planning to sell it and I was giving credit to Lauren it was probably OK...hope so.  Well anyway here they are:

I love that with digital stamps you can resize and flip them! My little row of birds down the bottom was tricky to colour in, but I love that there is one of each of the birds that are featured inside on the cards.  Here  is the card on it's own.  I stamped the little flowers with versamark and then heat embossed them with clear powder.


Here are a couple of pictures to show the depth of the box and that I have used velcro to fasten the lid.

As I do the rest of the cards I'll pop them in here for you to see, so make sure to check back if you are interested in what the final set will look like.  Thanks for stopping by and have a great day!

Wednesday, December 16, 2009

Teacher Gifts!

I am so pleased I have finished and given these out.  There were two more clipboards which didn't get photographed.  And I made about 7 of those chocolate boxes.


I'll be back later to let you know what each thing is made of and where I got my ideas. :)

Thursday, November 12, 2009

On a Christmas Theme!

Just thought I'd post a few Christmas projects from last year.  I'm trying to get myself in the mood for making Christmasssy things for this year!

Here are some little packets of reindeer food for little ones to sprinkle on the garden for Rudolph and friends.  Inside is a mix of oats and sprinkles!


You gotta love the Reindeer Poo idea!!! Inside are chocolate raisins but it would work just as well with chocolate covered peanuts.  Perfect stocking filler for those who have not been nice! Have you been naughty or nice?!!!!

A Christmas card.  What was a I thinking when I started to make this!? Threading all those beads on the wire and then stitching it on took forever!  I like the look though.


I think I got the idea for this from Splitcoaster stampers in this gallery somewhere.


A Kaisercraft wooden tree table decoration.

I taught this as a class a couple of years ago.  It is also Kaisercraft wooden hanging ornament.  Somewhere to place your Christmas wishlist, preserve your family traditions and keep last years Christmas photo on view!

I made these from a step by step tutorial on LSBS.  I love these as you can change the photo every year as they get older or just make a new one every year.  Great gifts to send out with the Christmas cards to grand parents or other relatives who live far away. And they are really quick to make too.

Once I get my butt into gear I'll put some of this years Christmas creations on here too!